
HOMER Grid 1.10


HOMER Grid allows you to add a tariff to your model in one of several ways. Click on an option in the table below to learn more.
Ways to add a tariff to your Model |
Best suited when |
|---|---|
Your tariff is in US/Canada/ Mexico |
|
Select from User Library |
You would like to add a tariff that you have already created from scratch using the Advanced Tariff Builder |
You could not select from the North American Library option, and your tariff is a simple tariff (consisting of only one flat energy rate, one demand rate and one fixed rate) or would like to create a complex custom tariff using the Advanced Tariff Builder. |
Other features with respect to tariffs are -
Tariff Feature |
Best suited when |
|---|---|
Your Tariff is comprised of a flat energy rate, one demand, and one fixed rate. |
|
You have not been able to find your tariff in the North American Library or your tariff is more complex than what the Simple Tariff option provides. This tool allows you to create tariffs with tiered, TOU, ratchet rates, contracted demand, importing real time prices, defining holidays etc. or retrieve a tariff from your user library. |
|
You have two tariffs (in a JSON format), one for the network rates and another for the retailer rates, and you need to combine them into one single tariff. |
A Tariff is a list of charges that comprise your electricity bill. This article describes the 4 steps to adding and verifying a tariff in your model:
▪Step 1: Add a tariff to your model
▪Step 2: Selecting the effective date of the tariff
▪Step 3: Provide any required inputs to the tariff
▪Step 4: Verify rates and bill for the tariff
▪Step 4a: Verify the rates in the tariff
▪Step 4b: Verify your electricity bill
To learn how to add multiple tariffs to your model, click here.
Step 1: Adding a tariff to your model
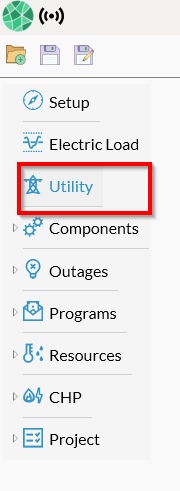
To add a tariff to your model, click Utility on the left side as highlighted below. This would open a pop-up window which will provide different ways to add a tariff to your model.
Once you have selected your tariff, follow the additional steps to add or verify specific tariff information. If you already have a tariff in your model and wish to add another, click the + sign to the right of the Tariff at the top of the page.
Step 2: Continue based on the way you chose to add a tariff to your model.
If you choose to add from the North American Library:
Enter your country or zip code and click “Get Tariffs”. From the menu, select tariff you want to add to your model and click “Ok”.
If you chose to select from the User Library:
Click a Tariff that is available in the User Library. Click “Ok” to add the tariff to your model.
If you chose to Create Custom:
Here, you create a simple tariff. Fill out the information in sections 1-4. When completed, click “Ok” to add the tariff to your model.
Select the Library option to create a Custom Tariff using the Advanced Tariff Builder.
Step 3: Select the Effective Date of the tariff
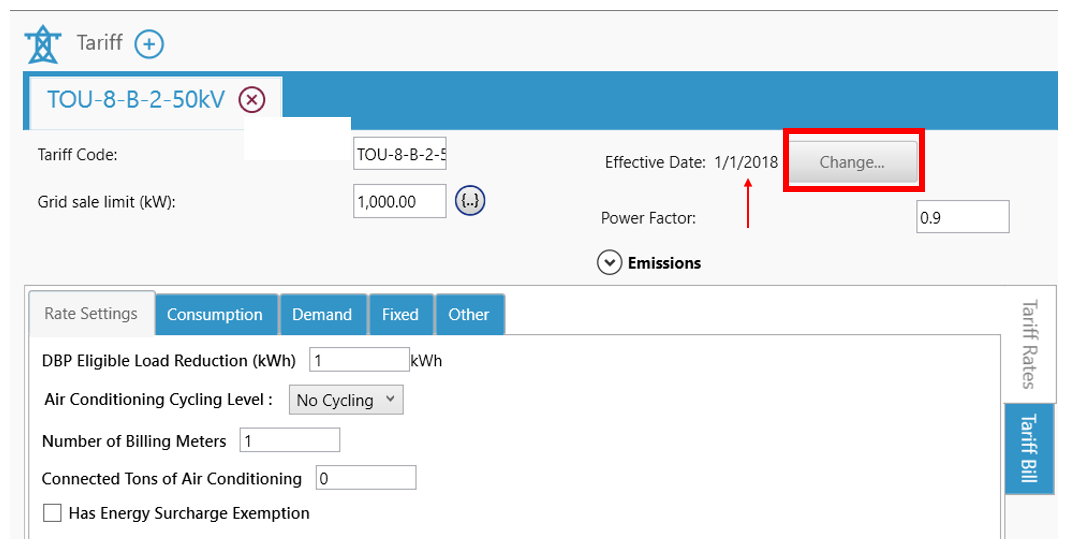
Utilities frequently update tariffs they offer. This leads to multiple version of the same electricity tariff (with the same tariff code and name). If you would like to use an older/future version of the tariff, you can do so by using the “Change Effective Date” feature. In the below screen shot, we have added the “TOU-8-B-2-50kV” tariff. The version of tariff currently in the model is effective from date “1/1/2018”. You can click on the “Change” button highlighted below and find the list of other future/past versions of this tariff.
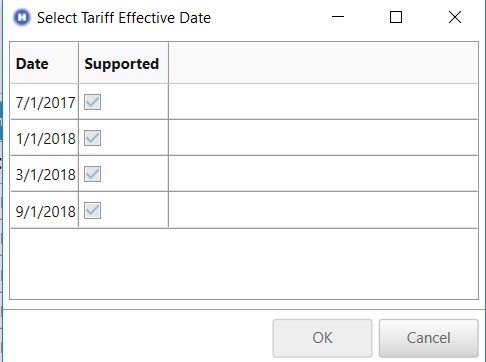
This will open a pop-up where you can see a list of dates. 9/1/2018 means a new version of this tariff was released by the utility and is effective from 1st of September 2018. Select the version you want and then click OK. You should see the “Effective Date” updated in your model.
Step 3: Adding Tariff inputs
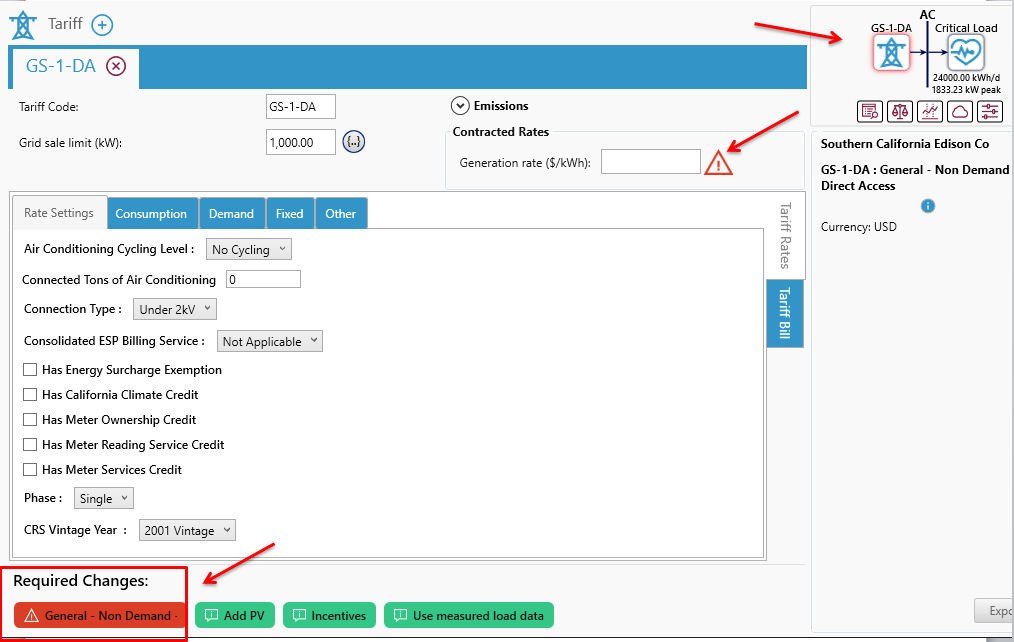
Before you can verify your tariff, you need to make sure your tariff does not have any required inputs. If you have any pending changes, then HOMER Grid will provide the following warnings/error messages:
▪A red highlight around the Utility icon in the schematic diagram on the right
▪A "Required Changes" on the bottom of the window.
▪A red exclamation mark inside a triangle drawing attention to the required text input fields
The tariff design page will appear different depending on the utility tariff included in your model. Click on the links below for possible additional inputs required by your tariff:
•Contracted Rates: Generation Rates
Grid Sale Limit (kW)
The grid sale limit is a limitation on the number of kW that may be sent or sold back to the grid in a given time step, in units of kW. To ensure no energy is sold back to the grid, specify 0. To see the impact of several different grid sale limits, use the sensitivity analysis option for this variable.
Rate Settings
A complex tariff from Genability (the tariff database) may look like this:
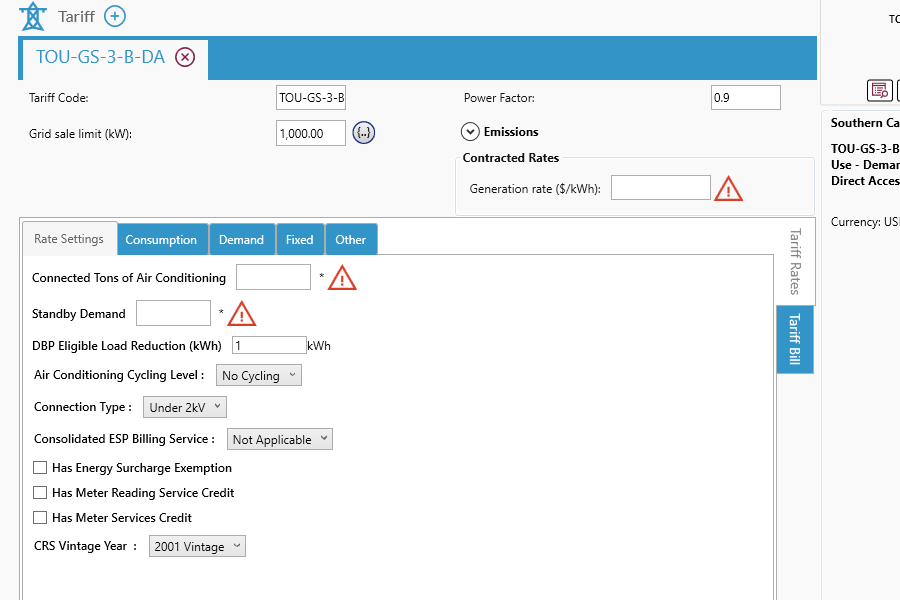
The information displayed in the ‘Rate Settings’ tab is information that comes directly from the Genability tariff database. Certain Rate Settings may be required to specify; required fields are denoted by the red warning icon.
For any of the variables listed in the ‘Rate Settings’ hover your mouse over the variable, and a tooltip will offer more details. In the example above, Contracted Demand and Maximum Demand at the Time of System Peak are required rate settings.
Based on your selections in the rate settings, the tariff prices may change.
If you have any questions about the meaning of the variables displayed in Rate Settings, please see Genability’s documentation for details.
Contracted Rates: Generation Rate
Certain tariffs in the Genability database will have a flag that means that you must specify a generation rate. Contracted generation rates are common in liberalized energy markets, where the energy distributor is a different entity than the energy generator. You must specify a number for this field, as it has the red warning icon, however, you may put $0.00 into this field if you believe that this field is not applicable to your site.
Power Factor
The power factor variable will appear for certain tariffs, if there is a need to convert kVA values to kW. The power factor (unitless) is equal to the real power (in Watts) divided by the apparent power (in volt-amps). Though power factor could be specified for every timestep of the model, the power factor must be entered here to be representative of the entire year, i.e. average power factor.
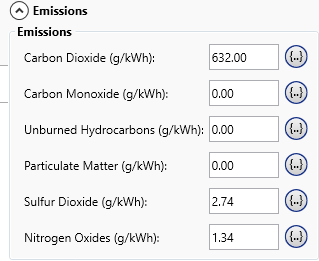
Emissions
To accurately account for system emissions, the emissions for the utility grid should be specified in the emissions drop-down.
Variable |
Description |
Carbon Dioxide |
The amount of carbon dioxide released per kWh of grid power consumed by the system, in grams/kWh |
Carbon Monoxide |
The amount of carbon monoxide released per kWh of grid power consumed by the system, in grams/kWh |
Unburned Hydrocarbons |
The amount of unburned hydrocarbons released per kWh of grid power consumed by the system, in grams/kWh |
Particulate Matter |
The amount of particulate matter released per kWh of grid power consumed by the system, in grams/kWh |
Sulfur Dioxide |
The amount of sulfur dioxide released per kWh of grid power consumed by the system, in grams/kWh |
Nitrogen Oxides |
The amount of nitrogen oxides released per kWh of grid power consumed by the system, in grams/kWh |
HOMER uses these emissions factors to calculate:
•The emissions of each pollutant resulting from grid power purchases.
•The avoided emissions of each pollutant resulting from grid power sales.
The values of these coefficients depend on the generation mix of the electricity in your area. In an area where the majority of the electricity is produced from coal, these values are relatively high because burning coal results in large emissions of pollutants. Natural gas generation results in somewhat lower emissions, and nuclear and hydro generation result in virtually no emissions of these pollutants.
See the table of US grid emissions factors section in the help for more information. For additional resources, see the Finding data to run HOMER section.
Step 4: Verify your Tariff
Once your tariff had been added successfully with no pending changes, you can then verify your tariff. Use the two tabs on the right to verify a tariff:
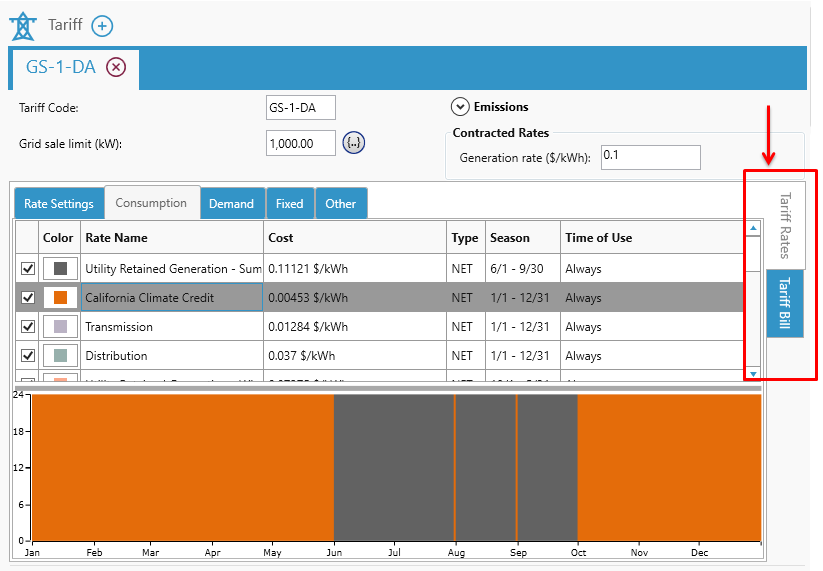
Step 4a: Verify the Tariff Rates
Select the Tariff Rates panel on the right side of utility page to view more detailed information about each of the following tariff rates. Click on one of following links for more specific information about each tariff rate.
Consumption
To understand the information that the tariff contains regarding consumption, select the consumption tab under the tariffs rates.
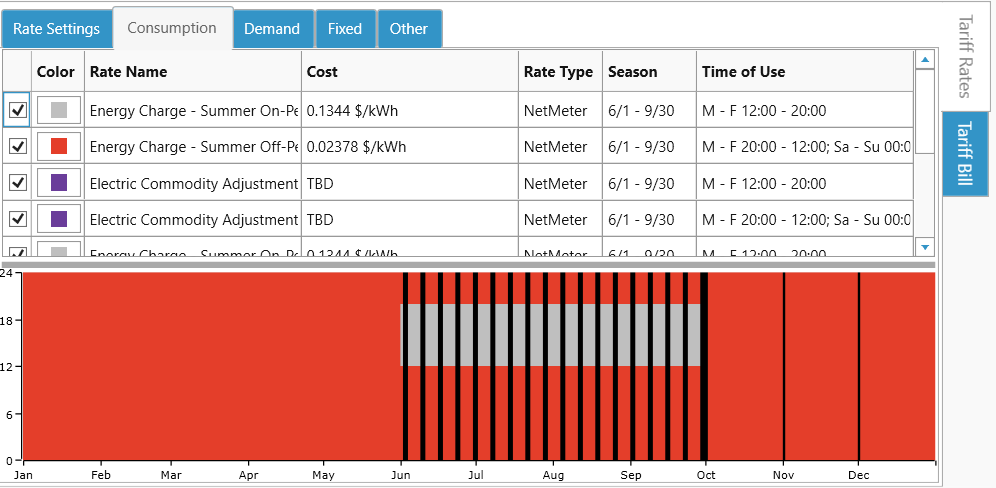
Specify the custom colors, which you’d like to see by clicking on the Color in the table. There are three types of consumption rates possible: Buy, Net-metering rates or ‘Net’, and Sell-back rates or ‘Sell’. These three categories are denoted under the ‘Type’ header in the table. The table denotes the cost, which can have a tiered cost. Hover over the cost line with your mouse to see all the information.
Demand
To understand the information that the tariff contains regarding demand rates, see the demand tab under the tariffs rates.
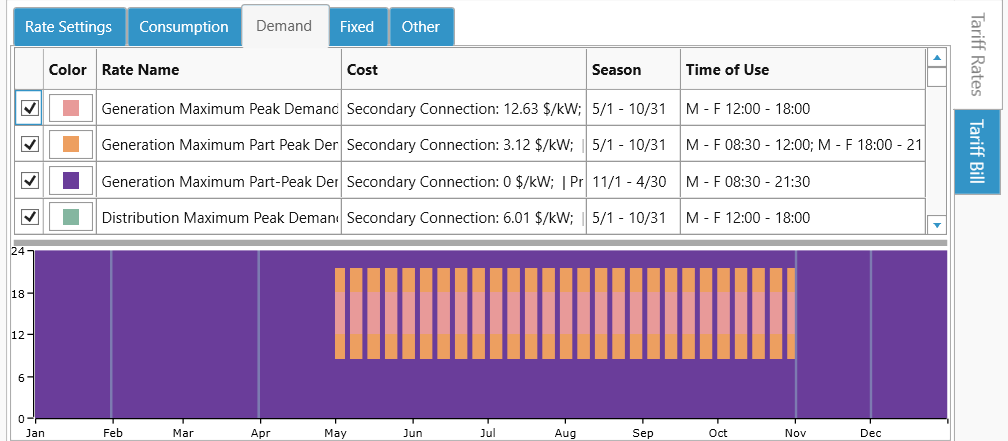
Similar to the consumption tab, change the color by clicking on the color in the table. Hover over cost and time of use information to see full details.
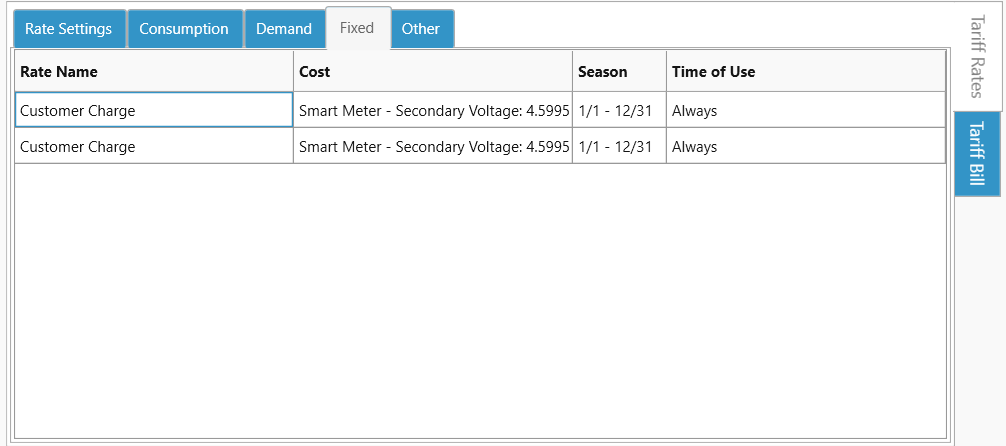
Fixed
Depending on your tariff, a mixture of fixed rates will be displayed in the fixed tab.
Other
Depending on the tariff that you’ve selected, various rates will be displayed in the ‘Other’ tab.
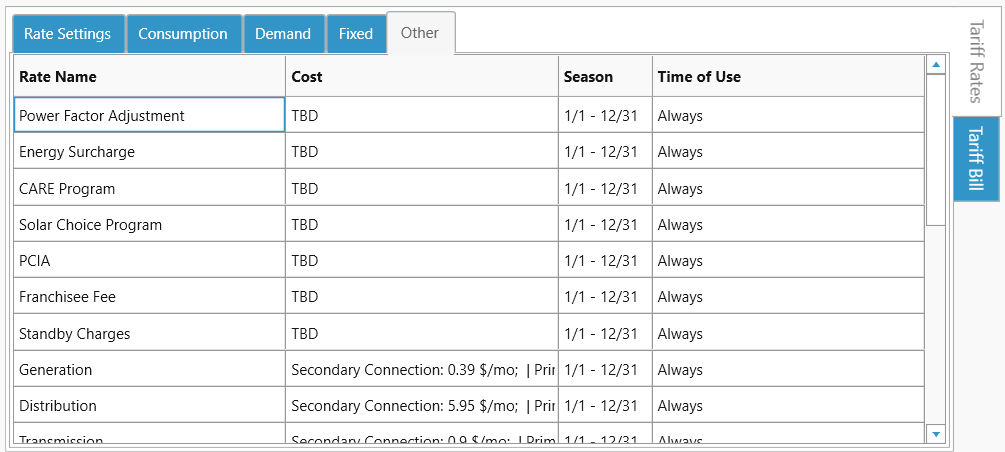
Costs denoted as "TBD" are rates depend on the electrical load and cannot be summarized without considering the electric load.
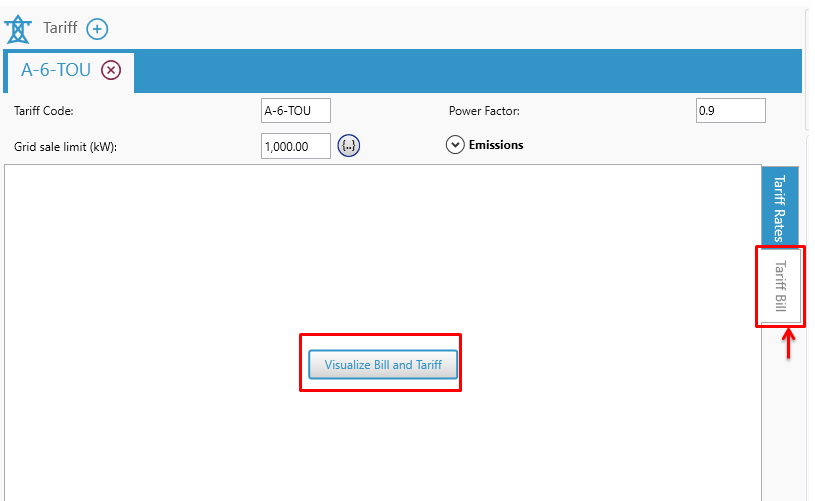
Step 4b: Verify the Tariff Bill
Select the Tariff Bill panel on the right side of utility page to view the following information. If you are clicking the "Tariff Bill" option for the first time, then you will see an additional button called "Visualize Bill and Tariff". Clicking this button will compute the bill with the electric load you have added.
Click on the links below for more detailed information included on your bill.
Utility Bill Graph
Energy and demand charges are graphed for each month, based on the combined information of the electrical load and the utility tariff.
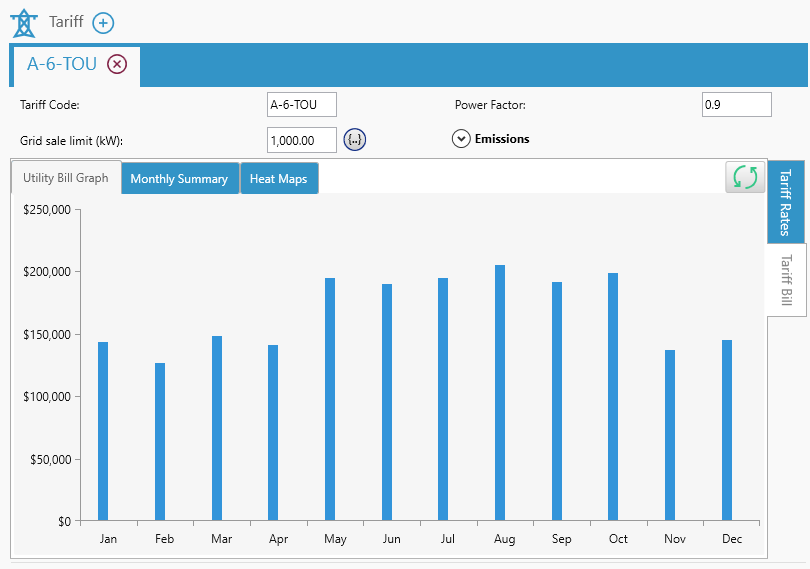
Tip: You’ll need to refresh the visualization if you change any load or tariff parameters. |
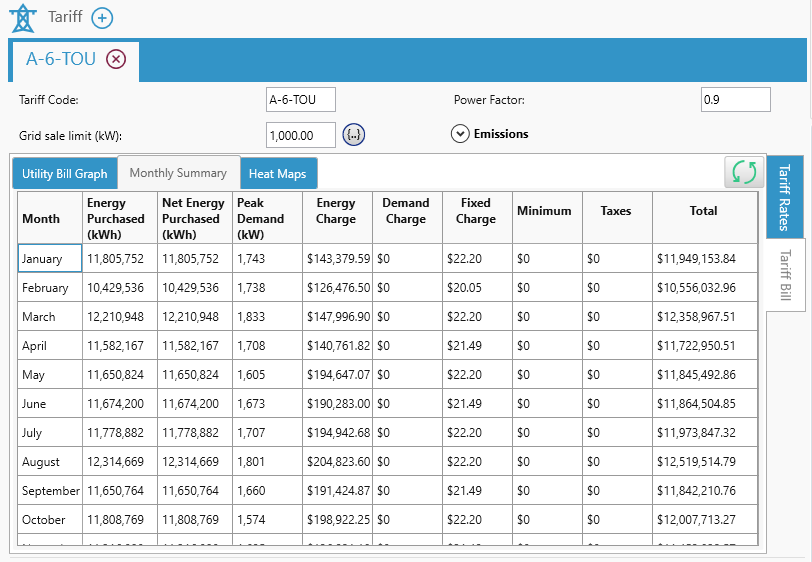
Monthly Summary
By month, energy purchased and peak demand are displayed, as well as energy, demand, fixed, and other charges.
Heat Maps
The heat maps here are a calculation based on the load and the tariff. Hover over the DMAP to see the energy and demand charges to expect in that time step.

