| Filtering Data |  |
Almost everywhere that Windographer aggregates data for calculations, display, or export, it allows you to filter the data in several ways. You can use this filtering capability to focus on a particular subset of your data, or to exclude data based on its flag status.
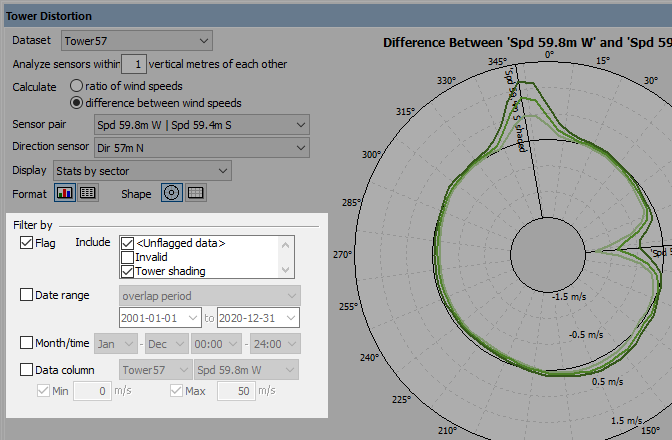
Any window that allows this kind of filtering contains a section labeled Filter by:

The filter controls allow you to filter the data in multiple ways: by flag, by date, by direction sector, by the value of any data column, and by requiring concurrency. Some of these controls do not always appear; the direction sector filter controls do not appear on the Wind Rose window for example, since direction sector filtering does not make sense in that window. When you make a change to any filter control, the graph or table you are looking at updates immediately to reflect the change in filter criteria.
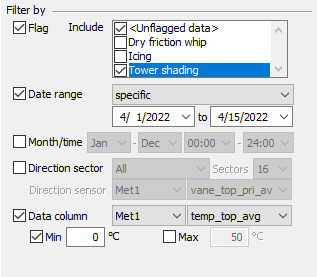
To be included in calculations, a data point must meet all your filter criteria. In the screenshot below, for example, the user has limited the calculations to include only those data points that meet three criteria:

In the filter by flag section, Windographer presents a checkbox list of all the flags that you have applied to any dataset in your workbook. The list always starts with <Unflagged data>, meaning data to which you have applied no flag. If the list of flags includes only this one checkbox, then you have not applied any flags to the dataset. See the article on flagging data for information on how to apply flags.
To filter by flag, check the checkbox labeled Flag and then check all the flags that you wish to include. For example, the settings below would include unflagged data points and any data points flagged with the 'Low quality' flag:

Tip: Leave unchecked all the flags that you wish to exclude. Exclusion takes priority over inclusion. The above settings will exclude any data points flagged as both 'Icing' and 'Low quality', for example, since your exclusion of 'Icing' data takes precedence over your inclusion of 'Low quality'.
You can filter by date in multiple ways.
The checkbox labeled Date range lets you filter for the dataset overlap period, a calendar year, or any specific date range.
You can choose a specific date range which goes from midnight at the beginning of the first date to midnight at the end of the second date. So to filter for a single 24-hour period, set both start and end to the same date. The settings below specify the a 24-hour period of June 8, 2019:

The settings below, for example, specify the 41-day interval from May 1 to June 10, 2019, inclusive:

The setting below will include all data from 2015. Windographer disables the specific date range controls when you select a calendar year in this way.

The checkbox labeled Month/time lets you filter for a specific time of day interval or a specific month interval. To view mid-day data, you could set the time interval to 11:00-13:00. To view overnight data, you could set the time interval to 20:00-05:00.
To view all northern winter data, set the month to Dec-Feb. To view all data from the month of May, set the month to May-May. When analyzing a five-year dataset, that will include all five Mays. If you wish to filter for a range of months but not by time of day, leave the time range filter at 00:00-24:00.
The settings below will include data for the months of June, July and August, only between the hours of 20:00 and 5:00:


Tip: Windographer can add a calculated data column of the time of day or the daylight expected at the dataset's latitude and longitude. You could then use that calculated column for similar time-of-day filtering.
To filter by direction sector, check the checkbox labeled Direction sector and choose the sector of interest, the dataset and direction sensor channel. Windographer will then include data only from those time steps in which the wind direction for that channel falls within that sector. If your workbook contains multiple datasets or wind direction sensors, you can choose the one that Windographer uses when making this determination. Note that Windographer will exclude any time steps in which this direction sensor reports no data or is flagged to exclude.
The drop-down box labeled Sectors lets you choose the number, and therefore size, of the direction sectors. By default, Windographer will choose the number of direction sectors that you have specified in your preferred wind rose settings in the Options window.
For some analyses, you may want to filter the data according to the value of a particular data column in a particular dataset. For example, you way wish to confine the calculations to a certain wind speed range, a certain temperature range, or a certain air density range.
You can do this by checking the checkbox labeled Data column, choosing the data column from the drop-down box, and then specifying the minimum and/or maximum allowable values for that data column. Note that Windographer will exclude time steps in which the filter data column contains no data.
Tip: Windographer always interprets ranges to mean greater than or equal to the minimum value, and less than the maximum value. So neighbouring intervals do not overlap: the range 6 - 8 does not overlap with the range 8 - 10. Values of precisely 8 will fall within the second range but not the first.
In windows that allow you to show data from multiple datasets, you can choose to require concurrency across datasets:

If the window is showing data from datasets A, B, and C, then requiring concurrency across those three datasets means that the analysis will use only those time steps containing valid data in all three datasets.
See also