
HOMER Pro 3.16

![]()
Folsom Lab's HelioScope is a software package that facilitates designing and engineering solar arrays. It consists of layout tools and energy simulations to help installers improve their solar array layouts. You can access HelioScope information using HOMER and incorporate it in your modeling. You need an active HelioScope license and an Internet connection to work with HelioScope.
The easiest way to incorporate HelioScope data is to upload the data directly from HelioScope using HOMER's HelioScope Wizard (through HelioScope's API). You can also use HOMER's HelioScope Wizard to import HelioScope's comma-separated value (CSV) simulation files when downloaded to your computer. A third, more advanced method of importing HelioScope files is to create a Custom Component and Resource.
Uploading Data From HelioScope
To upload HelioScope data from HelioScope, you use the HOMER's HelioScope Wizard and your HelioScope login credentials to access the data.
Accessing HOMER's HelioScope Wizard
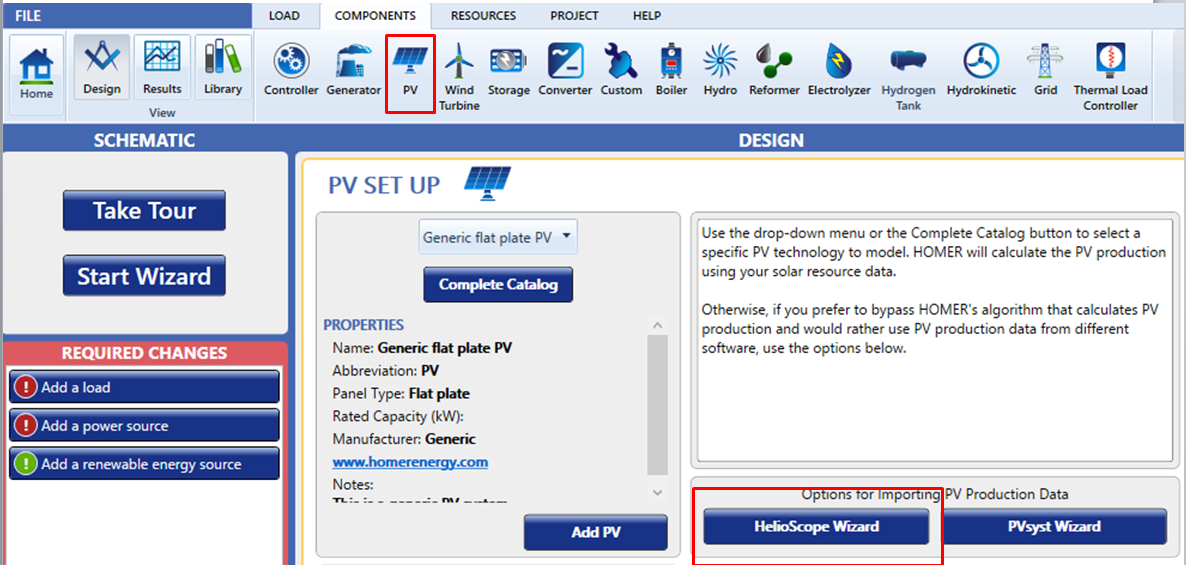
To access the HelioScope Wizard in HOMER, click the HelioScope Wizard button on the PV Set Up page.
This first page of the Wizard describes how HOMER and HelioScope work together.

Click the radio button for the function you want to perform:
•From HelioScope: To log in to HelioScope and upload your simulation results from HelioScope to HOMER using the HelioScope’s API.
•From your computer: To select and import a file that has been previously downloaded from HelioScope and saved onto your computer.

The two options are described in the respective sections below.
Uploading Results From HelioScope
To upload simulation results from HelioScope, enter your email address and HelioScope password.
1. Click one of your projects to select it.
2. Select one of your simulations from that project.

3. View the PV Power DMAP to verify that this is the correct project and simulation.
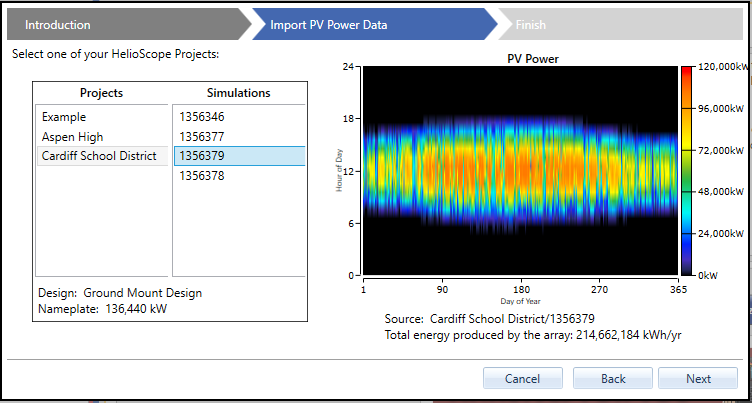
4. Complete the wizard process. A Custom Component appears.
5. Enter the total installation cost and total operational costs for the installed system.
Note: For more information on the Search Space and Cost inputs for the Custom Component, see the Completing the Custom Component section below.
Importing a HelioScope CSV File
To import a HelioScope CSV file, you must first download the file from HelioScope using your login credentials. Then you use HOMER's HelioScope Wizard to import the file.
Downloading a HelioScope CSV File
To import a HelioScope file into HOMER, you must first download the file from HelioScope.
1.Log in to HelioScope.
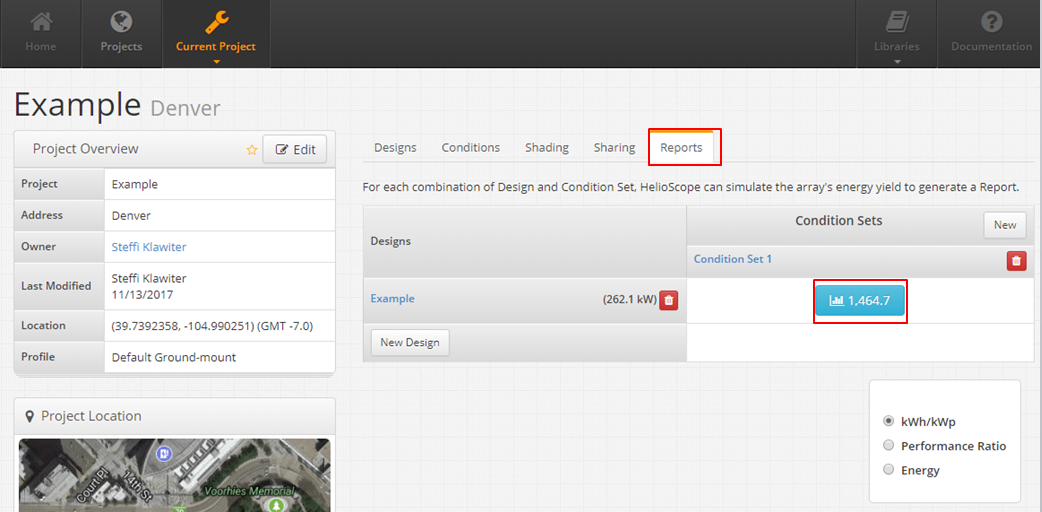
2.Navigate to the Reports tab.
3.Click a simulation result.
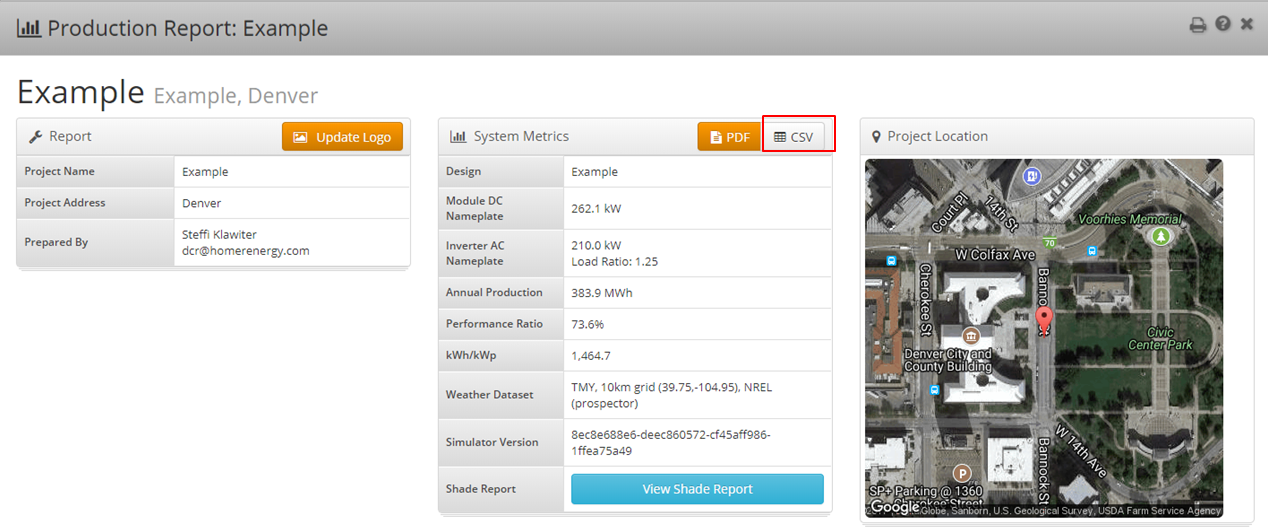
4.From the report, click the CSV button under System Metrics.
5.Select a location on your computer to download the file.
6.Click OK.
Importing CSV Files Using the HelioScope Wizard
In HOMER, open the HelioScope Wizard. For instructions, see the Accessing HOMER's HelioScope Wizard section above.
1.Click the From your computer radio button.
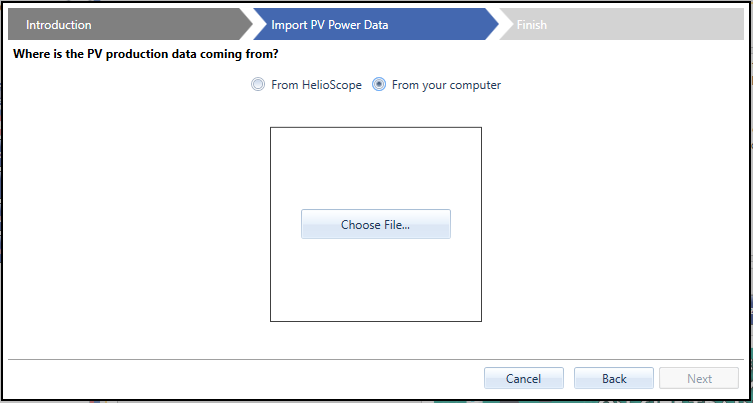
2.Click Choose File.
3.Select the downloaded CSV file on your computer.
4.Click OK.
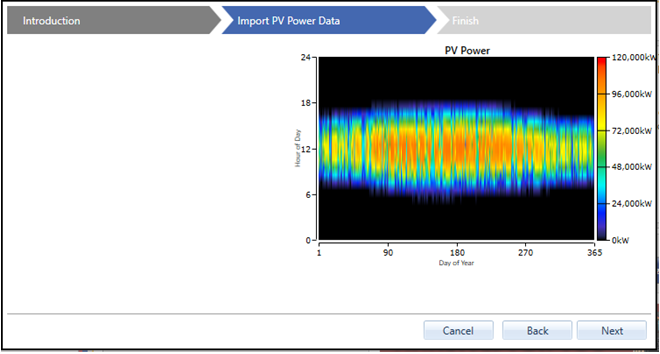
5.Verify that the file is correct by viewing the PV Power DMAP and the total production per year.
Note: If the imported power output accounts for energy loss and is negative at any time step, HOMER will treat these values as zero.
Note: To reupload, go back to the previous step.
6.Click Next. The Custom Component page appears.
7.Define the cost for the installed system size.
Note: For more information on the Search Space and Cost inputs for the Custom Component, see the Completing the Custom Component section below.
Importing HelioScope Files Using a Custom Component and Resource
A more advanced method for importing HelioScope files is to first create a Custom Component and Custom Resource. You must also download the file from HelioScope to your computer. See the instructions in the Downloading a HelioScope CSV File section above.
1.Click Custom under the Components tab. On the Custom Set Up page, select Renewable Power Source from the drop-down menu.
2.Click the Add Component button to create the new Custom Component.
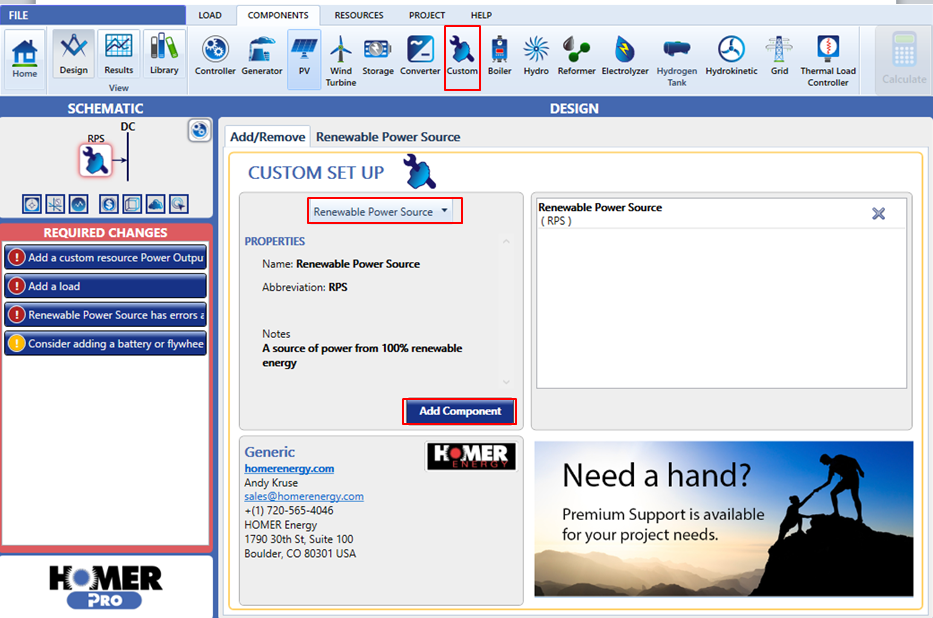
3.Optionally, you can change the icon for the Custom Component to a PV icon by selecting it from the drop-down menu of images.
![]()
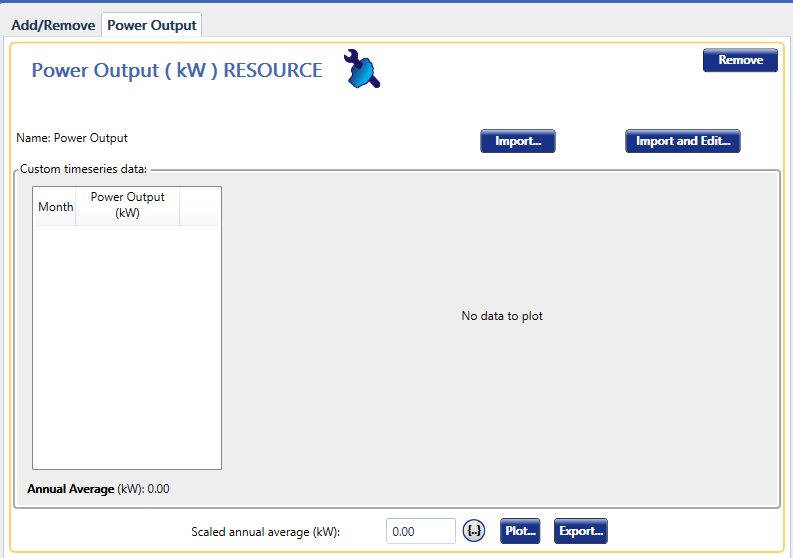
4.Custom Components need a Custom Resource. Click Custom under the Resources tab.
5.On the Custom Resource Set Up page, click the Add button.
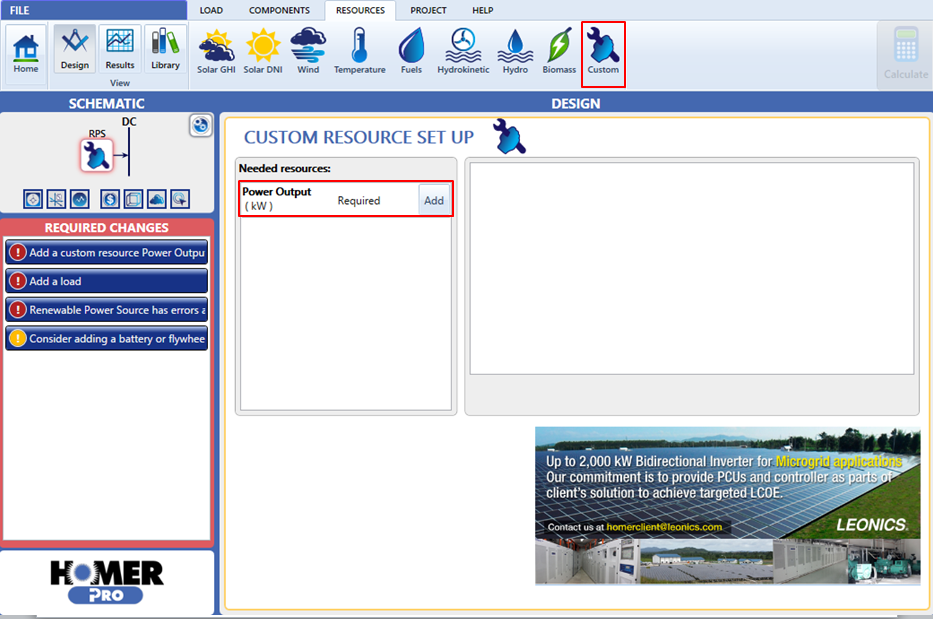
6.Click the Import button or the Import and Edit button. Complete the import process to import the downloaded CSV file.
7.Return to the Custom Component page. Select Renewable Power Source from the drop-down menu.
8.Select the appropriate Resource from the drop-down menu of Custom Resources. The imported HelioScope data appears.

9.Enter the total installed cost for the system.
10.Choose whether to use the Optimizer with the PV data, as described in the Completing the Custom Component Setup section below.
Completing the Custom Component Setup
After you have successfully imported or uploaded the HelioScope data, the Custom Component icon (or the icon you selected) is added to your system schematic. Click the icon to enter installation and O&M costs. The costs must represent the entire system size that HelioScope simulated.
If you only want the system to analyze the PV Component with or without the PV system size that HelioScope simulated, click the Search Space radio button and enter 0 and 1 only, where 1 represents the full installed capacity modeled within HelioScope.
If, on the other hand, you want the system to analyze whether it would be most economical to install a certain percentage of the system calculated in HelioScope, click the HOMER Optimizer® radio button and enter an upper boundary greater than 1.
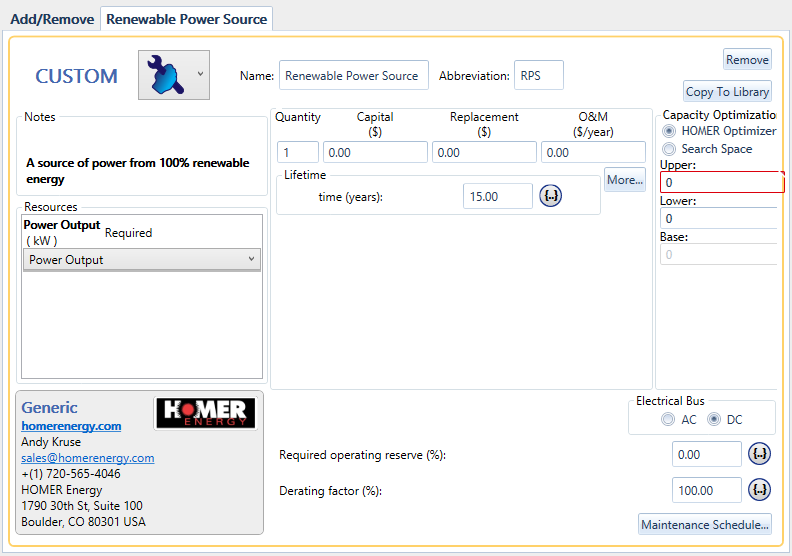
The power of combining the analysis of HelioScope and HOMER Pro comes from using the HOMER Optimizer with the HelioScope production results. The results show a decimal value if you use the Optimizer. A decimal between 0 and 1 represents a percentage of the PV array modeled; likewise, a number greater than 1 represents an installation size greater than what was modeled in HelioScope.
See also
How HOMER Calculates the PV Array Power Output
How HOMER Calculates the PV Cell Temperature
